Thursday, August 16, 2012

Saturday, December 3, 2011
2012 Utah Spearfishing Guidelines
The 2012 spearfishing guidelines are now available at utahscubadiver.com Spearfishing page.
To summerize; no new lakes were added for 2012 and the dates and times will remain the same.
The no-limit and catch-and-kill regulations apply to waters where the Division wants to remove species that were illegally stocked. These types of regulations also remove much of the incentive for those who initially dumped the fish.
No-limit regulation
This regulation allows anglers to take an unlimited number of smallmouth bass in Quail Creek, Sand Hollow and Gunlock reservoirs, and in the Virgin and Santa Clara rivers.
Catch-and-kill regulation
This regulation requires anglers to immediately kill any black bullhead catfish they catch in Deer Creek Reservoir and any northern pike they catch in Utah Lake.
See page 34 of the guidebook
To summerize; no new lakes were added for 2012 and the dates and times will remain the same.
The no-limit and catch-and-kill regulations apply to waters where the Division wants to remove species that were illegally stocked. These types of regulations also remove much of the incentive for those who initially dumped the fish.
No-limit regulation
This regulation allows anglers to take an unlimited number of smallmouth bass in Quail Creek, Sand Hollow and Gunlock reservoirs, and in the Virgin and Santa Clara rivers.
Catch-and-kill regulation
This regulation requires anglers to immediately kill any black bullhead catfish they catch in Deer Creek Reservoir and any northern pike they catch in Utah Lake.
See page 34 of the guidebook
Friday, December 2, 2011
Diving Dry Tips
After a number of years of diving dry I decided to add a few tips to help those in need or just need a little refresher.
Learning Curve
All suit manufactures have sizing charts for their stock suits so check those first to see if a stock suit will fit. The closer you are to those measurements the better the suit will fit. Sizing and fitting a dry suit can take some time so make sure you are sized by someone who has the knowledge and doesn’t just SWAG it. If you have a size that is outside the dimensions it would be for your comfort to consider a custom cut.
Fit is one reason why a large percentage of drysuit divers become discouraged and either sell their suit or reduce the number of cold water dives. Once properly fitted and beyond the initial learning curve divers look forward and never want to dive wet in cold water again.
I suggest 10-20 dives before you really get the hang of your dry suit since every diver’s learning curve and every suit is a little different.
Some dive shops will offer formal drysuit diving courses and they may be an effective way of covering the basics and getting into dry diving but it depends on the skill and experience of the instructor and the course price. Talk with the instructor and see what they cover, how many dry suit dives they do, what they expect from you as a student. Courses should at a minimum cover preventing and dealing with a feet first ascent, controlling a slow ascent from depth and dealing with valve failures and suit flooding.
Ah Latex
It is a fact that latex drysuit seals will not last longer than 5 years tops. So why do some divers need to replace their seals after only a few months? Maintenance!!!! Latex is delicate and needs to be protected from exposure to the sun, air (the ozone in air eats latex) heat and chemicals. The sun, heat and chemicals part is easy – just keep them away. But how do you keep air away? Pure Talc, use talc powder (SCENT FREE) applied liberally on both sides prior to storage is one method. Talc powder forms a thin protective layer on latex and it also makes the seals slide on easily the next time you get dressed to dive.
Another way is when your dry suit is not in use; use a vacuum sealed space saving type bag. Lay out the suit as flat as possible so it will still be able to fit inside the bag, attach the vacuum and vacuum out the air.
A third method, which is more costly initially, is when your latex seals need to be replaced, have new silicone seals installed. Silicone is not as sensitive to ozone and is less likely to tear during the donning of the suit.
Divers may develop a skin rash when they use latex seals. It happens most often with latex neck seals worn for long periods. If you have this problem or are allergic to latex then all you can do is convert to neoprene seals or buy silicone seals.
Seal It Up
Many drysuit divers find that their suits have leaks at their wrists and sometimes their necks, because the seals can’t seal over their protruding arteries and veins. It is most common with skinny divers or divers that hold onto things tightly. Here is a list of solutions in order of decreasing effectiveness/ increasing lunacy:
• Use tighter seals. Wrist seals can be very tight but tight neck seals are dangerous.
• If you are using neoprene seals then replace them with latex seals which don’t have a join/seam and generally seal better.
• Get yourself some silicone seals. These are wrist and neck seals made out of a very soft and flexible silicone gel. They conform to the shape of tendons much better than latex so a better seal is guaranteed.
• Wrist seals can sometimes be pulled down the arm a few inches away from the wrists where tendons are more pronounced.
• Use dry gloves that have their own seal over your wrist seals. A double seal.
• Insulation tape wrapped around the area where the skin meets the wrist seal works well but the glue on the tape could harm latex seals.
• Don’t hold onto anything too tightly. The more you squeeze the more you leak.
• Hair on the wrists and neck don’t help the seal. Shave it off.
• Don’t twist your neck around so much. If your buddy insists on swimming behind you then accidentally kick his/her mask off until you rectify this.
• Eat fatty foods and don’t exercise. Seals on plump soft wrists and necks won’t leak.
Oh Man
Everyone sprays off their drysuit after a dive and lets it dry in the shade but just about nobody dries the suit on the inside. It drives me crazy! Even if your suit didn’t leak during a dive I can guarantee that there will be wetness (condensation) inside the suit after the dive.
You really should, after drying the outside, turn it inside-out all the way down to the boots, and let the inside dry. It’s a bit of a pain but doing this prevents those nasty smells and the buildup of the moisture which is often blamed on non-existent leaks.
Is it the inside or the outside that you want dry anyway?
There is a common misconception among drysuit divers that a little bit of a drysuit leak or just a little bit of moisture finding its way in is fine, everyone has that, they say. Well I say that any leak, no matter how small, is not acceptable. You should be 100% dry. Why live with tiny leaks that could be easily fixed? A suit with several pin sized leaks could conceivably be dived in hundreds of times with the owner just accepting that the suit is slightly wet hundreds of times. That’s silly, just get those leaks fixed from the start and get new leaks fixed as soon as they occur.
To P or Not To P
Most drysuit divers or divers in general, fail to hydrate themselves properly for fear of needing to urinate during a dive. This is a bad idea; in fact it’s dangerous because dive de-hydration is linked to an increased susceptibility to DCS and a host of other unpleasant conditions.
The solution is simple – Drink plenty of clear liquid before the dive but stop 1 to 2 hours before the last opportunity to use the facilities. Some drinks pass through much faster than others so you need to get the type of drink you use and the period it will take to pass fine-tuned so that you start the dive hydrated but with your bladder as empty as possible.
If you still need to urinate during your dive then install a P-valve or P-zip. For a male, these valves can be used underwater and is connected by using a condom catheter. Drysuit diving ladies can import a device known as a “Shepee” which is a glued on (after shaving down there) “pad” type device and then connected to a standard P-valve. The P-zips can’t be used underwater but they are very useful for divers that have an urgency to go without having to strip down.
Not quite ready for the P or She P-valve? Then I recommend an adult diaper; that sounds terrible but actually modern diapers have hi-tech gels that absorb huge amounts of liquids and they don’t smell or make you look odd.
Warm And Fuzzy
Keeping warm in cold water is all about using the scientific principles of thermal insulation, conduction and dissipation along with an understanding of the human body thermal properties to your advantage. If one considers these factors and you know how drysuit and wetsuit materials work then the following basic conclusions can be made:
• Keep your head warm. Hands and feet are also important but the head is critical.
• The deeper you go the less a wetsuit insulates you. Drysuits are unaffected by depth.
• The physical nature of wetsuit material is important but the thickness is critical.
• Water flow inside a wetsuit (bad fit) completely destroys insulation.
• Drysuits are only as good as their undergarment.
• Undergarments are useless without sufficient air in them.
• Physical movement generates body heat.
Touchy Feely
Wearing nice thick 3-5mm neoprene gloves or better still, dry gloves is great for keeping your hands warm in cold water but every time I promote them to cold divers I get the “but then I can’t feel anything” line. What exactly do you need to feel? I suppose those little buttons on a digital camera might be tricky but everything else can be operated perfectly using really thick gloves. It just takes practice and sensible gear selection. Steer clear of small buttons on power inflators and hoods without a rim around the face opening that you can grasp ahold of. You need an inflator hose that either has a large ring or purchase plastic hats for the hose. It helps to avoid fancy clips that will make it difficult to grab and secure. Use the largest available size stainless steel (marine grade) BOLT SNAPS for attaching all your paraphernalia and you’re sorted. No feeling required.
Big Foot
Do you know what they say about drysuits with big boots? They probably belong to a diver with small feet. What a pain! Either they flop about and make swimming difficult or they are uncomfortably tight even with thin socks. The solution is simple – purchase a suit that has the correct sock size.
Shell It?
Since sport diving in drysuits began, the suits have been made in a laminated shell fabric, neoprene or a combination of the two. The debate over which material is best has raged for years and I’m afraid to say it will never end because there simply can never be a clear winner and more materials are being introduced all the time. Today you have tri laminate, cordura, crushed neoprene, compressed neoprene. The list goes on.
All materials have their pros and cons and there are also numerous variants of each type, all with their own specific properties. If you happen to find yourself in the position of needing to choose which type to use then my tip will be: Don’t listen to my advice. Get advice from divers that dive where you will dive and divers that use both types of drysuit. It gets confusing because somehow everyone thinks what they use or sell is best. Just take your time and get it right the first time.
Cool Keeper
Cold water diving often happens when the air temperature is quite high. I sometimes see fully kitted drysuit divers standing around waiting for their dive in the blazing hot sun - Are you crazy? Here are some tips on keeping cool before the dive:
• Kit up in the shade. If there is no shade then bring your beach umbrella along and set it up next to your car.
• Wet the outside of the suit. The evaporation will cool you down.
• Wait in the water. You can float about next to the boat or jetty while waiting.
• Keep the top part of your drysuit and inner undone/off before the dive.
• If the boat trip is fairly long ask the skipper to stop so that you can take a quick dip.
• For shore dives; never climb down steps or paths fully kitted if it’s hot. Rather carry everything down to the water’s edge and kit up there.
• Wear a big hat. Having your head in the shade makes a big difference.
Oh Buoy
All drysuit divers know how dry diving buoyancy is quite different and can be more difficult to control than wetsuit buoyancy. You have a second inflatable device in a rather strange shape with air flowing around in there. Here are a few tips to help you keep control:
• Don’t use the suit for buoyancy. The BC/wings are for buoyancy and the suit for warmth. Only add enough air to the suit to prevent squeeze.
• Never add weight with the intent of having more air in your suit so that you will have more insulation and be warmer. Trust me, it’s a bad idea.
• A good quality undergarment is essential as it will keep you warm with less air and hence less buoyancy control problems.
• It takes longer than you think to dump the air from your suit so that you can begin your descent. Think of all that fabric that traps air in your undergarment. It’s not like a BC/wing – it may take up to 10 seconds of continuous dumping to get it all out.
• Position your weights low down and forward. Lots of drysuit divers use tank weights and a weight belt but I prefer having weight lower and further to my front like with a weight belt and BC pocket weights.
• Gaiters are better than ankle weights when it comes to keeping your feet down.
• Heavy fins, like Jetfins, Rocketfins, Quattros are also useful at keeping your feet down and the air in the top half of the suit. Avoid the use of ankle weights since they tend to place undue stress on the ankles and knees.
• If you have a variable dump valve and you are new to using it you will be tempted to fiddle with it and make small adjustments all the time. Experienced variable dumpers only touch it 3 times during a dive.
Learning Curve
All suit manufactures have sizing charts for their stock suits so check those first to see if a stock suit will fit. The closer you are to those measurements the better the suit will fit. Sizing and fitting a dry suit can take some time so make sure you are sized by someone who has the knowledge and doesn’t just SWAG it. If you have a size that is outside the dimensions it would be for your comfort to consider a custom cut.
Fit is one reason why a large percentage of drysuit divers become discouraged and either sell their suit or reduce the number of cold water dives. Once properly fitted and beyond the initial learning curve divers look forward and never want to dive wet in cold water again.
I suggest 10-20 dives before you really get the hang of your dry suit since every diver’s learning curve and every suit is a little different.
Some dive shops will offer formal drysuit diving courses and they may be an effective way of covering the basics and getting into dry diving but it depends on the skill and experience of the instructor and the course price. Talk with the instructor and see what they cover, how many dry suit dives they do, what they expect from you as a student. Courses should at a minimum cover preventing and dealing with a feet first ascent, controlling a slow ascent from depth and dealing with valve failures and suit flooding.
Ah Latex
It is a fact that latex drysuit seals will not last longer than 5 years tops. So why do some divers need to replace their seals after only a few months? Maintenance!!!! Latex is delicate and needs to be protected from exposure to the sun, air (the ozone in air eats latex) heat and chemicals. The sun, heat and chemicals part is easy – just keep them away. But how do you keep air away? Pure Talc, use talc powder (SCENT FREE) applied liberally on both sides prior to storage is one method. Talc powder forms a thin protective layer on latex and it also makes the seals slide on easily the next time you get dressed to dive.
Another way is when your dry suit is not in use; use a vacuum sealed space saving type bag. Lay out the suit as flat as possible so it will still be able to fit inside the bag, attach the vacuum and vacuum out the air.
A third method, which is more costly initially, is when your latex seals need to be replaced, have new silicone seals installed. Silicone is not as sensitive to ozone and is less likely to tear during the donning of the suit.
Divers may develop a skin rash when they use latex seals. It happens most often with latex neck seals worn for long periods. If you have this problem or are allergic to latex then all you can do is convert to neoprene seals or buy silicone seals.
Seal It Up
Many drysuit divers find that their suits have leaks at their wrists and sometimes their necks, because the seals can’t seal over their protruding arteries and veins. It is most common with skinny divers or divers that hold onto things tightly. Here is a list of solutions in order of decreasing effectiveness/ increasing lunacy:
• Use tighter seals. Wrist seals can be very tight but tight neck seals are dangerous.
• If you are using neoprene seals then replace them with latex seals which don’t have a join/seam and generally seal better.
• Get yourself some silicone seals. These are wrist and neck seals made out of a very soft and flexible silicone gel. They conform to the shape of tendons much better than latex so a better seal is guaranteed.
• Wrist seals can sometimes be pulled down the arm a few inches away from the wrists where tendons are more pronounced.
• Use dry gloves that have their own seal over your wrist seals. A double seal.
• Insulation tape wrapped around the area where the skin meets the wrist seal works well but the glue on the tape could harm latex seals.
• Don’t hold onto anything too tightly. The more you squeeze the more you leak.
• Hair on the wrists and neck don’t help the seal. Shave it off.
• Don’t twist your neck around so much. If your buddy insists on swimming behind you then accidentally kick his/her mask off until you rectify this.
• Eat fatty foods and don’t exercise. Seals on plump soft wrists and necks won’t leak.
Oh Man
Everyone sprays off their drysuit after a dive and lets it dry in the shade but just about nobody dries the suit on the inside. It drives me crazy! Even if your suit didn’t leak during a dive I can guarantee that there will be wetness (condensation) inside the suit after the dive.
You really should, after drying the outside, turn it inside-out all the way down to the boots, and let the inside dry. It’s a bit of a pain but doing this prevents those nasty smells and the buildup of the moisture which is often blamed on non-existent leaks.
Is it the inside or the outside that you want dry anyway?
There is a common misconception among drysuit divers that a little bit of a drysuit leak or just a little bit of moisture finding its way in is fine, everyone has that, they say. Well I say that any leak, no matter how small, is not acceptable. You should be 100% dry. Why live with tiny leaks that could be easily fixed? A suit with several pin sized leaks could conceivably be dived in hundreds of times with the owner just accepting that the suit is slightly wet hundreds of times. That’s silly, just get those leaks fixed from the start and get new leaks fixed as soon as they occur.
To P or Not To P
Most drysuit divers or divers in general, fail to hydrate themselves properly for fear of needing to urinate during a dive. This is a bad idea; in fact it’s dangerous because dive de-hydration is linked to an increased susceptibility to DCS and a host of other unpleasant conditions.
The solution is simple – Drink plenty of clear liquid before the dive but stop 1 to 2 hours before the last opportunity to use the facilities. Some drinks pass through much faster than others so you need to get the type of drink you use and the period it will take to pass fine-tuned so that you start the dive hydrated but with your bladder as empty as possible.
If you still need to urinate during your dive then install a P-valve or P-zip. For a male, these valves can be used underwater and is connected by using a condom catheter. Drysuit diving ladies can import a device known as a “Shepee” which is a glued on (after shaving down there) “pad” type device and then connected to a standard P-valve. The P-zips can’t be used underwater but they are very useful for divers that have an urgency to go without having to strip down.
Not quite ready for the P or She P-valve? Then I recommend an adult diaper; that sounds terrible but actually modern diapers have hi-tech gels that absorb huge amounts of liquids and they don’t smell or make you look odd.
Warm And Fuzzy
Keeping warm in cold water is all about using the scientific principles of thermal insulation, conduction and dissipation along with an understanding of the human body thermal properties to your advantage. If one considers these factors and you know how drysuit and wetsuit materials work then the following basic conclusions can be made:
• Keep your head warm. Hands and feet are also important but the head is critical.
• The deeper you go the less a wetsuit insulates you. Drysuits are unaffected by depth.
• The physical nature of wetsuit material is important but the thickness is critical.
• Water flow inside a wetsuit (bad fit) completely destroys insulation.
• Drysuits are only as good as their undergarment.
• Undergarments are useless without sufficient air in them.
• Physical movement generates body heat.
Touchy Feely
Wearing nice thick 3-5mm neoprene gloves or better still, dry gloves is great for keeping your hands warm in cold water but every time I promote them to cold divers I get the “but then I can’t feel anything” line. What exactly do you need to feel? I suppose those little buttons on a digital camera might be tricky but everything else can be operated perfectly using really thick gloves. It just takes practice and sensible gear selection. Steer clear of small buttons on power inflators and hoods without a rim around the face opening that you can grasp ahold of. You need an inflator hose that either has a large ring or purchase plastic hats for the hose. It helps to avoid fancy clips that will make it difficult to grab and secure. Use the largest available size stainless steel (marine grade) BOLT SNAPS for attaching all your paraphernalia and you’re sorted. No feeling required.
Big Foot
Do you know what they say about drysuits with big boots? They probably belong to a diver with small feet. What a pain! Either they flop about and make swimming difficult or they are uncomfortably tight even with thin socks. The solution is simple – purchase a suit that has the correct sock size.
Shell It?
Since sport diving in drysuits began, the suits have been made in a laminated shell fabric, neoprene or a combination of the two. The debate over which material is best has raged for years and I’m afraid to say it will never end because there simply can never be a clear winner and more materials are being introduced all the time. Today you have tri laminate, cordura, crushed neoprene, compressed neoprene. The list goes on.
All materials have their pros and cons and there are also numerous variants of each type, all with their own specific properties. If you happen to find yourself in the position of needing to choose which type to use then my tip will be: Don’t listen to my advice. Get advice from divers that dive where you will dive and divers that use both types of drysuit. It gets confusing because somehow everyone thinks what they use or sell is best. Just take your time and get it right the first time.
Cool Keeper
Cold water diving often happens when the air temperature is quite high. I sometimes see fully kitted drysuit divers standing around waiting for their dive in the blazing hot sun - Are you crazy? Here are some tips on keeping cool before the dive:
• Kit up in the shade. If there is no shade then bring your beach umbrella along and set it up next to your car.
• Wet the outside of the suit. The evaporation will cool you down.
• Wait in the water. You can float about next to the boat or jetty while waiting.
• Keep the top part of your drysuit and inner undone/off before the dive.
• If the boat trip is fairly long ask the skipper to stop so that you can take a quick dip.
• For shore dives; never climb down steps or paths fully kitted if it’s hot. Rather carry everything down to the water’s edge and kit up there.
• Wear a big hat. Having your head in the shade makes a big difference.
Oh Buoy
All drysuit divers know how dry diving buoyancy is quite different and can be more difficult to control than wetsuit buoyancy. You have a second inflatable device in a rather strange shape with air flowing around in there. Here are a few tips to help you keep control:
• Don’t use the suit for buoyancy. The BC/wings are for buoyancy and the suit for warmth. Only add enough air to the suit to prevent squeeze.
• Never add weight with the intent of having more air in your suit so that you will have more insulation and be warmer. Trust me, it’s a bad idea.
• A good quality undergarment is essential as it will keep you warm with less air and hence less buoyancy control problems.
• It takes longer than you think to dump the air from your suit so that you can begin your descent. Think of all that fabric that traps air in your undergarment. It’s not like a BC/wing – it may take up to 10 seconds of continuous dumping to get it all out.
• Position your weights low down and forward. Lots of drysuit divers use tank weights and a weight belt but I prefer having weight lower and further to my front like with a weight belt and BC pocket weights.
• Gaiters are better than ankle weights when it comes to keeping your feet down.
• Heavy fins, like Jetfins, Rocketfins, Quattros are also useful at keeping your feet down and the air in the top half of the suit. Avoid the use of ankle weights since they tend to place undue stress on the ankles and knees.
• If you have a variable dump valve and you are new to using it you will be tempted to fiddle with it and make small adjustments all the time. Experienced variable dumpers only touch it 3 times during a dive.
Monday, September 19, 2011
Sand Hollow Clean Up 2011
Once again we are taking part in a Clean Up day as part of our Dive A Long series being held again this year at Sand Hollow state park near Hurricane, Utah.
Date: Saturday, September 24
Time: 10:00 - 5:30
We will not be doing this solo. A couple other stores from around the state are planning and attending. This is not about stores but about keeping Utah dive sites clean.
Date: Saturday, September 24
Time: 10:00 - 5:30
We will not be doing this solo. A couple other stores from around the state are planning and attending. This is not about stores but about keeping Utah dive sites clean.
Sunday, September 18, 2011
Kevin Sorensen Going All Out
Whether coaching a championship paintball team, racing around in his "Vette" or becomming a diver, Kevin goes all out. Congratulations Kevin on recieveing your Master Scuba Diver rating.
 |
| Kevin surfacing from a wreck dive on Cozumel |
Friday, April 8, 2011
Digital File Formats
A couple of us were chatting in the pool recently while waiting for a youth group to get ready and the topic of UW photos can up and I mention the file format RAW.
I felt I may have lost some in translation.
Here’s a simplistic description of how your digital camera works. You press the shutter release and light from the image you’re photographing shines on a digital sensor (instead of film). That sensor consists of a grid of pixels that capture the image and store it on whatever digital media (e.g., memory card) you put into your camera.
Every manufacturer’s sensor has its own digital format. That’s the sensor’s RAW format. If you’re shooting RAW, all that means is that the sensor stores the image in its own proprietary format on memory.
What’s the alternative? You could configure your camera to store the image in a standard format like JPEG. Not all cameras let you shoot RAW. Lower end cameras don’t give you the option; they’ll store the image in JPEG. The sensor shoots whatever RAW format it uses, but the camera converts the image to JPEG before storing and only gives you options about image size and compression (more about this later).
What’s the big deal? Well, two things. First, since the sensor is storing its proprietary RAW format, it’s fast. Second, ALL the image information from the sensor is stored in memory. You haven’t lost any information. By the way, that also means the image is BIG. For example, a 12 megapixel RAW format runs about 11 megabytes. That’s big!
RAW is also proprietary, meaning you need software from the manufacturer to read and manipulate it. many manufactures provide a free software package you can download to your PC to read their RAW format and convert it to JPEG or TIFF. Some software packages include RAW readers for major manufacturers (MAC’s iPhoto and Aperture software packages read RAW).
Once you’ve edited your picture, you’ll probably want to share it. That’s when you convert it to a standard format. JPEG is the most popular because it’s not only standard, it also compresses the image to make it less painful to post on a web page or e-mail. Any software package can open JPEG.
JPEG compresses your file by comparing successive pixels of your image and deciding whether a series is close enough to just store the information once and copy. More compression means greater differences are ignored; you get a smaller file but you lose image quality. You can also compress the file by reducing the pixel count (less megapixels). When you’re saving your image, your software will give you a dialogue box that gives you both options (image size and quality).
Want to preserve ALL your image quality but still have a standard format? The most popular is TIFF but TIFF is BIG. A 12 megapixel image that runs about 11mb RAW runs about 30mb TIFF!
So, to summarize. All digital camera sensors shoot RAW. Lower end cameras convert RAW to JPEG and give you options about image size and compression so you can trade image quality for storing more images on a given memory card. Higher end cameras give you the option of storing RAW for faster storage and highest quality images, but you need to make sure you have software on your computer that will read and process RAW.
I felt I may have lost some in translation.
Here’s a simplistic description of how your digital camera works. You press the shutter release and light from the image you’re photographing shines on a digital sensor (instead of film). That sensor consists of a grid of pixels that capture the image and store it on whatever digital media (e.g., memory card) you put into your camera.
Every manufacturer’s sensor has its own digital format. That’s the sensor’s RAW format. If you’re shooting RAW, all that means is that the sensor stores the image in its own proprietary format on memory.
What’s the alternative? You could configure your camera to store the image in a standard format like JPEG. Not all cameras let you shoot RAW. Lower end cameras don’t give you the option; they’ll store the image in JPEG. The sensor shoots whatever RAW format it uses, but the camera converts the image to JPEG before storing and only gives you options about image size and compression (more about this later).
What’s the big deal? Well, two things. First, since the sensor is storing its proprietary RAW format, it’s fast. Second, ALL the image information from the sensor is stored in memory. You haven’t lost any information. By the way, that also means the image is BIG. For example, a 12 megapixel RAW format runs about 11 megabytes. That’s big!
RAW is also proprietary, meaning you need software from the manufacturer to read and manipulate it. many manufactures provide a free software package you can download to your PC to read their RAW format and convert it to JPEG or TIFF. Some software packages include RAW readers for major manufacturers (MAC’s iPhoto and Aperture software packages read RAW).
Once you’ve edited your picture, you’ll probably want to share it. That’s when you convert it to a standard format. JPEG is the most popular because it’s not only standard, it also compresses the image to make it less painful to post on a web page or e-mail. Any software package can open JPEG.
JPEG compresses your file by comparing successive pixels of your image and deciding whether a series is close enough to just store the information once and copy. More compression means greater differences are ignored; you get a smaller file but you lose image quality. You can also compress the file by reducing the pixel count (less megapixels). When you’re saving your image, your software will give you a dialogue box that gives you both options (image size and quality).
Want to preserve ALL your image quality but still have a standard format? The most popular is TIFF but TIFF is BIG. A 12 megapixel image that runs about 11mb RAW runs about 30mb TIFF!
So, to summarize. All digital camera sensors shoot RAW. Lower end cameras convert RAW to JPEG and give you options about image size and compression so you can trade image quality for storing more images on a given memory card. Higher end cameras give you the option of storing RAW for faster storage and highest quality images, but you need to make sure you have software on your computer that will read and process RAW.
Monday, January 3, 2011
Utah Spearfishing Guidelines
The 2011 spearfishing guidelines are now available at utahscubadiver.com Spearfishing page.
To summerize; no new lakes were added for 2011 and the dates and times will remain the same.
To all anglers White Bass has been illegally introduced into Deer Creek and there is a mandatory 'kill on sight' rule. Read the guide for full details.
To summerize; no new lakes were added for 2011 and the dates and times will remain the same.
To all anglers White Bass has been illegally introduced into Deer Creek and there is a mandatory 'kill on sight' rule. Read the guide for full details.
Friday, August 13, 2010
Sand Hollow Clean Up
Once again we are taking part in the International Clean Up day being held this year at Sand Hollow state park near Hurricane, Utah.
Date: Saturday, September 25
Time: 11:00 - 5:30
Prizes, BBQ and Treasure Hunt are among the activities planned.
We will not be doing this solo. A couple other stores from around the state are planning and attending. This is not about stores but about keeping Utah dive sites clean.
Date: Saturday, September 25
Time: 11:00 - 5:30
Prizes, BBQ and Treasure Hunt are among the activities planned.
We will not be doing this solo. A couple other stores from around the state are planning and attending. This is not about stores but about keeping Utah dive sites clean.
Just in, Park Is It
I always enjoy the what ever it takes attitude of divers.
A couple months ago we ventured to Flaming Gorge for some fun and fun
training...it's all fun.
During a surface swim from around Osprey Island we were talking as a group about number of dives and other related topics. Justin mentioned he had now 49 dives and the dive we just completed in a dry suit was his fifth specialty. That number always peaks my interest since it's just one dive away from one of the requirements for the PADI Master Scuba Diver rating. After some thought...ok about 5 seconds worth, Janine and Justin decided that it was a what ever it takes moment. After checking pressure levels in their tanks and making a plan, they dropped along the walls of the 'Gorge' and headed towards the exit point. Crusing along at 30-40 feet for 30 minutes they enjoyed the company of Bass and a great wall dive Utah style.
Justin Park you are it, a what ever it takes diver.
Congratulations on achieving the Master Scuba Diver rating.

A couple months ago we ventured to Flaming Gorge for some fun and fun
training...it's all fun.
During a surface swim from around Osprey Island we were talking as a group about number of dives and other related topics. Justin mentioned he had now 49 dives and the dive we just completed in a dry suit was his fifth specialty. That number always peaks my interest since it's just one dive away from one of the requirements for the PADI Master Scuba Diver rating. After some thought...ok about 5 seconds worth, Janine and Justin decided that it was a what ever it takes moment. After checking pressure levels in their tanks and making a plan, they dropped along the walls of the 'Gorge' and headed towards the exit point. Crusing along at 30-40 feet for 30 minutes they enjoyed the company of Bass and a great wall dive Utah style.
Justin Park you are it, a what ever it takes diver.
Congratulations on achieving the Master Scuba Diver rating.

Friday, July 9, 2010
Drowning Doesn’t Look Like Drowning
This outstanding article was shared elsewhere and I am in no way the author.
I know that this isn't technically directly related to basic scuba discussions, I'm posting it here so that it gets more exposure.
If you follow the link, there is an excellent discussion following the article:
http://ht.ly/28PJ2
Drowning Doesn’t Look Like Drowning
by Mario on May 18, 2010 in Boating Safety, Coast Guard, gCaptain
The new captain jumped from the cockpit, fully dressed, and sprinted through the water. A former lifeguard, he kept his eyes on his victim as he headed straight for the owners who were swimming between their anchored sportfisher and the beach. “I think he thinks you’re drowning,” the husband said to his wife. They had been splashing each other and she had screamed but now they were just standing, neck-deep on the sand bar. “We’re fine, what is he doing?” she asked, a little annoyed. “We’re fine!” the husband yelled, waving him off, but his captain kept swimming hard. ”Move!” he barked as he sprinted between the stunned owners. Directly behind them, not ten feet away, their nine-year-old daughter was drowning. Safely above the surface in the arms of the captain, she burst into tears, “Daddy!”
How did this captain know, from fifty feet away, what the father couldn’t recognize from just ten? Drowning is not the violent, splashing, call for help that most people expect. The captain was trained to recognize drowning by experts and years of experience. The father, on the other hand, had learned what drowning looks like by watching television. If you spend time on or near the water (hint: that’s all of us) then you should make sure that you and your crew knows what to look for whenever people enter the water. Until she cried a tearful, “Daddy,” she hadn’t made a sound. As a former Coast Guard rescue swimmer, I wasn’t surprised at all by this story. Drowning is almost always a deceptively quiet event. The waving, splashing, and yelling that dramatic conditioning (television) prepares us to look for, is rarely seen in real life.
The Instinctive Drowning Response – so named by Francesco A. Pia, Ph.D., is what people do to avoid actual or perceived suffocation in the water. And it does not look like most people expect. There is very little splashing, no waving, and no yelling or calls for help of any kind. To get an idea of just how quiet and undramatic from the surface drowning can be, consider this: It is the number two cause of accidental death in children, age 15 and under (just behind vehicle accidents) – of the approximately 750 children who will drown next year, about 375 of them will do so within 25 yards of a parent or other adult. In ten percent of those drownings, the adult will actually watch them do it, having no idea it is happening (source: CDC). Drowning does not look like drowning – Dr. Pia, in an article in the Coast Guard’s On Scene Magazine, described the instinctive drowning response like this:
1. Except in rare circumstances, drowning people are physiologically unable to call out for help. The respiratory system was designed for breathing. Speech is the secondary or overlaid function. Breathing must be fulfilled, before speech occurs.
2. Drowning people’s mouths alternately sink below and reappear above the surface of the water. The mouths of drowning people are not above the surface of the water long enough for them to exhale, inhale, and call out for help. When the drowning people’s mouths are above the surface, they exhale and inhale quickly as their mouths start to sink below the surface of the water.
3. Drowning people cannot wave for help. Nature instinctively forces them to extend their arms laterally and press down on the water’s surface. Pressing down on the surface of the water, permits drowning people to leverage their bodies so they can lift their mouths out of the water to breathe.
4. Throughout the Instinctive Drowning Response, drowning people cannot voluntarily control their arm movements. Physiologically, drowning people who are struggling on the surface of the water cannot stop drowning and perform voluntary movements such as waving for help, moving toward a rescuer, or reaching out for a piece of rescue equipment.
5. From beginning to end of the Instinctive Drowning Response people’s bodies remain upright in the water, with no evidence of a supporting kick. Unless rescued by a trained lifeguard, these drowning people can only struggle on the surface of the water from 20 to 60 seconds before submersion occurs.
(Source: On Scene Magazine: Fall 2006)
This doesn’t mean that a person that is yelling for help and thrashing isn’t in real trouble – they are experiencing aquatic distress. Not always present before the instinctive drowning response, aquatic distress doesn’t last long – but unlike true drowning, these victims can still assist in their own rescue. They can grab lifelines, throw rings, etc.
Look for these other signs of drowning when persons are n the water:
Head low in the water, mouth at water level
Head tilted back with mouth open
Eyes glassy and empty, unable to focus
Eyes closed
Hair over forehead or eyes
Not using legs – Vertical
Hyperventilating or gasping
Trying to swim in a particular direction but not making headway
Trying to roll over on the back
Ladder climb, rarely out of the water.
So if a crew member falls overboard and every looks O.K. – don’t be too sure. Sometimes the most common indication that someone is drowning is that they don’t look like they’re drowning. They may just look like they are treading water and looking up at the deck. One way to be sure? Ask them: “Are you alright?” If they can answer at all – they probably are. If they return a blank stare – you may have less than 30 seconds to get to them. And parents: children playing in the water make noise. When they get quiet, you get to them and find out why.
Dive Safe
I know that this isn't technically directly related to basic scuba discussions, I'm posting it here so that it gets more exposure.
If you follow the link, there is an excellent discussion following the article:
http://ht.ly/28PJ2
Drowning Doesn’t Look Like Drowning
by Mario on May 18, 2010 in Boating Safety, Coast Guard, gCaptain
The new captain jumped from the cockpit, fully dressed, and sprinted through the water. A former lifeguard, he kept his eyes on his victim as he headed straight for the owners who were swimming between their anchored sportfisher and the beach. “I think he thinks you’re drowning,” the husband said to his wife. They had been splashing each other and she had screamed but now they were just standing, neck-deep on the sand bar. “We’re fine, what is he doing?” she asked, a little annoyed. “We’re fine!” the husband yelled, waving him off, but his captain kept swimming hard. ”Move!” he barked as he sprinted between the stunned owners. Directly behind them, not ten feet away, their nine-year-old daughter was drowning. Safely above the surface in the arms of the captain, she burst into tears, “Daddy!”
How did this captain know, from fifty feet away, what the father couldn’t recognize from just ten? Drowning is not the violent, splashing, call for help that most people expect. The captain was trained to recognize drowning by experts and years of experience. The father, on the other hand, had learned what drowning looks like by watching television. If you spend time on or near the water (hint: that’s all of us) then you should make sure that you and your crew knows what to look for whenever people enter the water. Until she cried a tearful, “Daddy,” she hadn’t made a sound. As a former Coast Guard rescue swimmer, I wasn’t surprised at all by this story. Drowning is almost always a deceptively quiet event. The waving, splashing, and yelling that dramatic conditioning (television) prepares us to look for, is rarely seen in real life.
The Instinctive Drowning Response – so named by Francesco A. Pia, Ph.D., is what people do to avoid actual or perceived suffocation in the water. And it does not look like most people expect. There is very little splashing, no waving, and no yelling or calls for help of any kind. To get an idea of just how quiet and undramatic from the surface drowning can be, consider this: It is the number two cause of accidental death in children, age 15 and under (just behind vehicle accidents) – of the approximately 750 children who will drown next year, about 375 of them will do so within 25 yards of a parent or other adult. In ten percent of those drownings, the adult will actually watch them do it, having no idea it is happening (source: CDC). Drowning does not look like drowning – Dr. Pia, in an article in the Coast Guard’s On Scene Magazine, described the instinctive drowning response like this:
1. Except in rare circumstances, drowning people are physiologically unable to call out for help. The respiratory system was designed for breathing. Speech is the secondary or overlaid function. Breathing must be fulfilled, before speech occurs.
2. Drowning people’s mouths alternately sink below and reappear above the surface of the water. The mouths of drowning people are not above the surface of the water long enough for them to exhale, inhale, and call out for help. When the drowning people’s mouths are above the surface, they exhale and inhale quickly as their mouths start to sink below the surface of the water.
3. Drowning people cannot wave for help. Nature instinctively forces them to extend their arms laterally and press down on the water’s surface. Pressing down on the surface of the water, permits drowning people to leverage their bodies so they can lift their mouths out of the water to breathe.
4. Throughout the Instinctive Drowning Response, drowning people cannot voluntarily control their arm movements. Physiologically, drowning people who are struggling on the surface of the water cannot stop drowning and perform voluntary movements such as waving for help, moving toward a rescuer, or reaching out for a piece of rescue equipment.
5. From beginning to end of the Instinctive Drowning Response people’s bodies remain upright in the water, with no evidence of a supporting kick. Unless rescued by a trained lifeguard, these drowning people can only struggle on the surface of the water from 20 to 60 seconds before submersion occurs.
(Source: On Scene Magazine: Fall 2006)
This doesn’t mean that a person that is yelling for help and thrashing isn’t in real trouble – they are experiencing aquatic distress. Not always present before the instinctive drowning response, aquatic distress doesn’t last long – but unlike true drowning, these victims can still assist in their own rescue. They can grab lifelines, throw rings, etc.
Look for these other signs of drowning when persons are n the water:
Head low in the water, mouth at water level
Head tilted back with mouth open
Eyes glassy and empty, unable to focus
Eyes closed
Hair over forehead or eyes
Not using legs – Vertical
Hyperventilating or gasping
Trying to swim in a particular direction but not making headway
Trying to roll over on the back
Ladder climb, rarely out of the water.
So if a crew member falls overboard and every looks O.K. – don’t be too sure. Sometimes the most common indication that someone is drowning is that they don’t look like they’re drowning. They may just look like they are treading water and looking up at the deck. One way to be sure? Ask them: “Are you alright?” If they can answer at all – they probably are. If they return a blank stare – you may have less than 30 seconds to get to them. And parents: children playing in the water make noise. When they get quiet, you get to them and find out why.
Dive Safe
When Things Go Wrong. Understanding The Panic Cycle
The panic cycle is a simple process and quite easy to understand.
A problem causes stress. If that stress leads to anxiety, a couple of things take place. The diver's heart rate increases. The diver's breathing rate increases. This rapid breathing is usually shallow breathing. Rapid, shallow breathing results in a decreased gas exchange in the lungs. This causes the carbon dioxide level in the diver's lungs to increase. As we all know, an increased carbon dioxide level in the lungs triggers the need to breathe. Breathing becomes faster and shallower in a snowball effect. Now in addition to the original problem the diver is feeling he can't get enough air. The diver focuses on the original problem and the problem of not getting enough air. That focus is not on what can I do to solve these problems, but on what the result might be. "I'm underwater and I can't breathe. I have to get to the surface now!" Panic is mere seconds away.
What causes this cycle to start?
A problem that leads to anxiety. In diving, things go wrong from time to time. If you have a leaky mask, that's a problem. Is it a big problem or a little problem? If you clear your mask with ease, it's a little problem. It's such a small problem, you may not even recognize it as a problem. If you have difficulty with this skill, it could be a big problem. The more skills we possess and the more confidence we have in our skills, the more likely any given problem will be a small one. A class that includes confidence building goes a long way toward preventing the panic cycle from ever starting.
On the other hand, no one is perfect. No one is immune to anxiety and fear. When a diver feels anxiety, he needs to recognize it and concentrate on slow, deep breathing. Taking slow deep breaths stops the feeling of being air starved. The diver then needs to think, not about the problem, but about solutions to the problem. Look at the big picture and solve the problem. In Dennis Graver's book Scuba Diving, he says something I think is very important, "Take control of your thoughts before they take control of you." Concentrating on the problem and possible consequences can be deadly. Divers need to concentrate on the solution to the problem.
This article is courtesy of "Walter"
A problem causes stress. If that stress leads to anxiety, a couple of things take place. The diver's heart rate increases. The diver's breathing rate increases. This rapid breathing is usually shallow breathing. Rapid, shallow breathing results in a decreased gas exchange in the lungs. This causes the carbon dioxide level in the diver's lungs to increase. As we all know, an increased carbon dioxide level in the lungs triggers the need to breathe. Breathing becomes faster and shallower in a snowball effect. Now in addition to the original problem the diver is feeling he can't get enough air. The diver focuses on the original problem and the problem of not getting enough air. That focus is not on what can I do to solve these problems, but on what the result might be. "I'm underwater and I can't breathe. I have to get to the surface now!" Panic is mere seconds away.
What causes this cycle to start?
A problem that leads to anxiety. In diving, things go wrong from time to time. If you have a leaky mask, that's a problem. Is it a big problem or a little problem? If you clear your mask with ease, it's a little problem. It's such a small problem, you may not even recognize it as a problem. If you have difficulty with this skill, it could be a big problem. The more skills we possess and the more confidence we have in our skills, the more likely any given problem will be a small one. A class that includes confidence building goes a long way toward preventing the panic cycle from ever starting.
On the other hand, no one is perfect. No one is immune to anxiety and fear. When a diver feels anxiety, he needs to recognize it and concentrate on slow, deep breathing. Taking slow deep breaths stops the feeling of being air starved. The diver then needs to think, not about the problem, but about solutions to the problem. Look at the big picture and solve the problem. In Dennis Graver's book Scuba Diving, he says something I think is very important, "Take control of your thoughts before they take control of you." Concentrating on the problem and possible consequences can be deadly. Divers need to concentrate on the solution to the problem.
This article is courtesy of "Walter"
Sunday, March 7, 2010
Scott and Judy Will Be In First Class
Last year during a trip to Mexico we are waiting to board the plane. All of a sudden they call a couple from our group to the ticket counter. Think happy thoughts. Well it seems there was an over booking and they were choosen to fly in first class. Well it was only fitting. You see it was Scott and Judy's honeymoon and why not.
Fast forward. Today is another 'first class' moment. After recently logging their 50th dive at the Homestead Crater, yeah we wish it was in the tropics also, they have now reached the Master Scuba Diver rating. So when you see this happy couple walking around, give them a congratulations and ask what they plan to do for their 100th dive.
Fast forward. Today is another 'first class' moment. After recently logging their 50th dive at the Homestead Crater, yeah we wish it was in the tropics also, they have now reached the Master Scuba Diver rating. So when you see this happy couple walking around, give them a congratulations and ask what they plan to do for their 100th dive.
Congratulations Scott and Judy Steele. Always first class.
Sunday, November 8, 2009
Your Ears While Scuba Diving
While I have been under the weather and not under the water I've been researching ear issues and how they relate to diving since one of my issues has been inflammation of the eustachian tubes and congestion.
While I found several good articles on my issues I also found some great information on your ears and diving, specifically equalization. If you don't read any of this I HIGHLY recommend you at least watch the video by Dr. Edmmond Kay.

While I found several good articles on my issues I also found some great information on your ears and diving, specifically equalization. If you don't read any of this I HIGHLY recommend you at least watch the video by Dr. Edmmond Kay.

Valsalva Maneuver: This is the method most divers learn. Pinch your nose and gently blow through your nose. The resulting overpressure in your throat usually forces air up your Eustachian tubes. The Valsalva maneuver has three problems: It does not activate muscles which open the Eustachian tubes, so it may not work if the tubes are already locked by a pressure differential. It’s all too easy to blow hard enough to damage something and If delayed will become difficult to equalize if not impossible. With the valsalva the key is equalize early and often.
Toynbee Maneuver: With your nose pinched, swallow. Swallowing pulls open your Eustachian tubes while the movement of your tongue, with your nose closed, compresses air against them. Swallowing can be difficult for the novice diver, especially while breathing dry air. This technique is not recommended for rapid descent, as there is no margin for error if the Eustachian tube does not equalize on first effort. If a middle ear squeeze is already occurring, it will be more difficult for the Eustachian tube to be pulled open.
Lowery Technique: A combination of Valsalva and Toynbee. While closing your nose, blow and swallow at the same time. This technique is very effective once it is mastered.
Edmonds Technique: While tensing the soft palate (the soft tissue at the back of the roof of your mouth) and throat muscles and pushing the jaw forward and down, do a Valsalva or Frenzel maneuver or combine a head tilt with a Valsalva or Frenzel maneuver to more effectively open the Eustachian tube.
Frenzel Maneuver: Pinch your nose and close the back of your throat as if straining to lift a weight. Then make the sound of the letter "K." This forces the back of your tongue upward, compressing air against the openings of your Eustachian tubes.
A diver may practice the technique by watching the nose inflate and by watching the "Adams Apple" move up and down. This technique is that can be done anytime during the respiratory cycle while the effort is usually brief and can be repeated may times quickly.
Voluntary Tubal Opening: Tense the muscles of the soft palate and the throat while pushing the jaw forward and down as if starting to yawn. These muscles pull the Eustachian tubes open. This requires a lot of practice, but some divers can learn to control those muscles and hold their tubes open for continuous equalization.
Practice Makes Perfect Divers who experience difficulty equalizing may find it helpful to master several techniques. Many are difficult until practiced repeatedly, but this is one scuba skill you can practice anywhere. Try practicing in front of a mirror so you can watch your throat muscles.
When To Equalize Sooner, and more often, than you might think. Most authorities recommend equalizing every two feet of descent. At a fairly slow descent rate of 60 feet per minute, that’s an equalization every two seconds. Many divers descend much faster and should be equalizing constantly.
The good news: as you go deeper, you’ll have to equalize less often-another result of Boyle’s Law. For example, a descent of six feet from the surface will compress your middle ear space by 20 percent and produce pain. But from 30 feet you’d have to descend another 12.5 feet to get the same 20 percent compression.
Toynbee Maneuver: With your nose pinched, swallow. Swallowing pulls open your Eustachian tubes while the movement of your tongue, with your nose closed, compresses air against them. Swallowing can be difficult for the novice diver, especially while breathing dry air. This technique is not recommended for rapid descent, as there is no margin for error if the Eustachian tube does not equalize on first effort. If a middle ear squeeze is already occurring, it will be more difficult for the Eustachian tube to be pulled open.
Lowery Technique: A combination of Valsalva and Toynbee. While closing your nose, blow and swallow at the same time. This technique is very effective once it is mastered.
Edmonds Technique: While tensing the soft palate (the soft tissue at the back of the roof of your mouth) and throat muscles and pushing the jaw forward and down, do a Valsalva or Frenzel maneuver or combine a head tilt with a Valsalva or Frenzel maneuver to more effectively open the Eustachian tube.
Frenzel Maneuver: Pinch your nose and close the back of your throat as if straining to lift a weight. Then make the sound of the letter "K." This forces the back of your tongue upward, compressing air against the openings of your Eustachian tubes.
A diver may practice the technique by watching the nose inflate and by watching the "Adams Apple" move up and down. This technique is that can be done anytime during the respiratory cycle while the effort is usually brief and can be repeated may times quickly.
Voluntary Tubal Opening: Tense the muscles of the soft palate and the throat while pushing the jaw forward and down as if starting to yawn. These muscles pull the Eustachian tubes open. This requires a lot of practice, but some divers can learn to control those muscles and hold their tubes open for continuous equalization.
Practice Makes Perfect Divers who experience difficulty equalizing may find it helpful to master several techniques. Many are difficult until practiced repeatedly, but this is one scuba skill you can practice anywhere. Try practicing in front of a mirror so you can watch your throat muscles.
When To Equalize Sooner, and more often, than you might think. Most authorities recommend equalizing every two feet of descent. At a fairly slow descent rate of 60 feet per minute, that’s an equalization every two seconds. Many divers descend much faster and should be equalizing constantly.
The good news: as you go deeper, you’ll have to equalize less often-another result of Boyle’s Law. For example, a descent of six feet from the surface will compress your middle ear space by 20 percent and produce pain. But from 30 feet you’d have to descend another 12.5 feet to get the same 20 percent compression.
Dive safe.
Would You Dive In A Thunderstorm
In a recent Divemaster class there was a question about what would cause you to cancel a dive. Now the book had all sorts of reasons; weather, visability, water or air temperature, entry not safe and a few others. Well given out location most of those conditions would not warrant canceling a dive except for weather. Now the only weather I could think of that would make me call a dive would be a thunder or lighting storm. So here is my question to you.
If you had the oppertunity to dive Blue Lake and just before you hit the water the skies turned ugly and the a big thunder bumper was rolling on top of you. Would you cancel the dive?
I created a poll located at the bottom of the blog. Let's see what you have to say.
If you had the oppertunity to dive Blue Lake and just before you hit the water the skies turned ugly and the a big thunder bumper was rolling on top of you. Would you cancel the dive?
I created a poll located at the bottom of the blog. Let's see what you have to say.
Wednesday, October 21, 2009
DAN 24-Hour SCUBA Diving Emergency Hotline Has Changed
Effective immediately, the phone number for the DAN 24-Hour SCUBA Diving Emergency Hotline has changed. The new number is (919) 684-9111.
The change, dubbed “One Call,” is part of the continuing mission of Divers Alert Network® (DAN®) to increase the safety of SCUBA divers. With the new hotline number, divers need only to call a single phone number to activate emergency services, regardless of what kind of emergency assistance is needed.
“Over the last few years, as the benefits and resources we provided the dive industry increased, so did the phone numbers to access the assistance,” said Nicholas Bird, MD, vice president of DAN Medical Services. “SCUBA divers were getting understandably confused. By simplifying the process to a single phone number, we’ve given divers needing assistance one less thing to think about in a stressful situation.”
The new number replaces the need to decide whether to call DAN, TravelAssist to facilitate emergency evacuation, or a medical facility. Simply call DAN at the new hotline number, and all emergency assistance will be triaged and facilitated from there.
“We had a goal this year to streamline our emergency assistance resources,” said Dan Orr, president and CEO of DAN. “One Call is a huge step toward that goal, and it’s an extremely positive step in moving SCUBA diver safety forward.”
DAN’s previous hotline numbers will remain in effect for a transitional grace period. However, all divers are encouraged to update their emergency contact information and emergency assistance plans as soon as possible.
As always, in the case of an immediate life-threatening emergency, contact 911 (or the equivalent emergency response system), and then call DAN.
The DAN Emergency Hotline (919-684-9111) is available 24-hours a day, 7 days a week. It can be reached by collect call or from outside the U.S.
The change, dubbed “One Call,” is part of the continuing mission of Divers Alert Network® (DAN®) to increase the safety of SCUBA divers. With the new hotline number, divers need only to call a single phone number to activate emergency services, regardless of what kind of emergency assistance is needed.
“Over the last few years, as the benefits and resources we provided the dive industry increased, so did the phone numbers to access the assistance,” said Nicholas Bird, MD, vice president of DAN Medical Services. “SCUBA divers were getting understandably confused. By simplifying the process to a single phone number, we’ve given divers needing assistance one less thing to think about in a stressful situation.”
The new number replaces the need to decide whether to call DAN, TravelAssist to facilitate emergency evacuation, or a medical facility. Simply call DAN at the new hotline number, and all emergency assistance will be triaged and facilitated from there.
“We had a goal this year to streamline our emergency assistance resources,” said Dan Orr, president and CEO of DAN. “One Call is a huge step toward that goal, and it’s an extremely positive step in moving SCUBA diver safety forward.”
DAN’s previous hotline numbers will remain in effect for a transitional grace period. However, all divers are encouraged to update their emergency contact information and emergency assistance plans as soon as possible.
As always, in the case of an immediate life-threatening emergency, contact 911 (or the equivalent emergency response system), and then call DAN.
The DAN Emergency Hotline (919-684-9111) is available 24-hours a day, 7 days a week. It can be reached by collect call or from outside the U.S.
Wednesday, September 23, 2009
Most Favorite
I received a PM on a forum from someone asking me where my favorite place to dive in Utah was. I had to wait before I could respond, not because I was to busy, but because I had to think about it for a while. Just like no tropical destination is the same, the same goes for our local diving. Think about this, where else could you go and dive 95 degree water in the winter and drive 5 minutes away and explore under the ice if you were so inclined? So my answer to their question was, my favorite is the one I'm exploring next or the one I haven't explored. In the twenty something years I've been to a few of our lakes.
Two weeks ago Flaming Gorge was my favorite. Why? Because I have yet to have a bad dive there and I haven't seen all there is to see. The wall around Osprey Island is fascinating and if you slow down and really look you can find some amazing formations.
This weekend the Crater will be my favorite even though I have explored this site a gazillion times. Besides looking at the turtle, t-rex, gator, wagon wheel or the hot tub at the bottom, have you really looked at the sides? The formations look like petrified wood. Have you found the spout where the water exits? Did you know there are small tubes like a lava tube along the sides? Not everything to see is at the bottom.
Next weekend and the weekend after that it will be Sand Hollow. Why? because this is a site I have yet to explore, not dive but explore. That's what makes local diving so much fun, exploring. It's an adventure, to boldly go where no man, strike that, you have never been before.
Now Sand Hollow has some training platforms, a buoyancy course, a sunken Cessna airplane and a 'bus'. Trust me those will be fun...way fun. What I want to see are the formations of the red rock by the island. Trust me I'll explore.
So what's your favorite?
Two weeks ago Flaming Gorge was my favorite. Why? Because I have yet to have a bad dive there and I haven't seen all there is to see. The wall around Osprey Island is fascinating and if you slow down and really look you can find some amazing formations.
This weekend the Crater will be my favorite even though I have explored this site a gazillion times. Besides looking at the turtle, t-rex, gator, wagon wheel or the hot tub at the bottom, have you really looked at the sides? The formations look like petrified wood. Have you found the spout where the water exits? Did you know there are small tubes like a lava tube along the sides? Not everything to see is at the bottom.
Next weekend and the weekend after that it will be Sand Hollow. Why? because this is a site I have yet to explore, not dive but explore. That's what makes local diving so much fun, exploring. It's an adventure, to boldly go where no man, strike that, you have never been before.
Now Sand Hollow has some training platforms, a buoyancy course, a sunken Cessna airplane and a 'bus'. Trust me those will be fun...way fun. What I want to see are the formations of the red rock by the island. Trust me I'll explore.
So what's your favorite?
Monday, September 21, 2009
Kim Turns 50
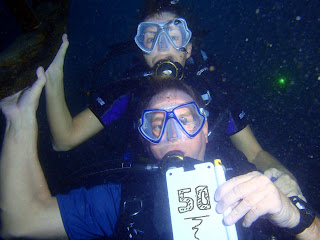
Kim was excited and with a flash.....oops wrong story.......and in a flash lifts a slate with 50 scribe on it.
No we're not talking about age, not even close, we're talking about diving, after all this is a scuba blog. geeesh
This was dive 50, the number of dives needed to obtain the Master Scuba Diver rating.
In a 'dive by' Kim gives us the scuba version of a happy dance, flashes a big smile and hands out several double handed fist pumps and then proceeds to having more fun. Oh there were other congratulatory things but nothing that should be put in print..... only because I'm the author and I blush easily.
While the open water students there really had no idea what it all meant, they had to know it was something big unless diving really is that much fun.
Well yes it is but that's a different topic.
Upon surfacing with our students, Kim's still doing a happy dance on the dock and to show how happy she is, jumps in the water, gets my hair all wet...geeesh and gives more hugs all around.
After calming down it's logbook time.
Did you know that the PADI Training Logbook only allows for 49 dives? Oh my what is one to do? Just so you know the back page works just fine when someone is determined to turn 50.
It was great to be there, to see you diving, to see how you have progressed and sign your logbook.
What an honor.
Congratulations Kim Calder

No we're not talking about age, not even close, we're talking about diving, after all this is a scuba blog. geeesh
This was dive 50, the number of dives needed to obtain the Master Scuba Diver rating.
In a 'dive by' Kim gives us the scuba version of a happy dance, flashes a big smile and hands out several double handed fist pumps and then proceeds to having more fun. Oh there were other congratulatory things but nothing that should be put in print..... only because I'm the author and I blush easily.
While the open water students there really had no idea what it all meant, they had to know it was something big unless diving really is that much fun.
Well yes it is but that's a different topic.
Upon surfacing with our students, Kim's still doing a happy dance on the dock and to show how happy she is, jumps in the water, gets my hair all wet...geeesh and gives more hugs all around.
After calming down it's logbook time.
Did you know that the PADI Training Logbook only allows for 49 dives? Oh my what is one to do? Just so you know the back page works just fine when someone is determined to turn 50.
It was great to be there, to see you diving, to see how you have progressed and sign your logbook.
What an honor.
Congratulations Kim Calder

Monday, September 14, 2009
Good Ole Time
Diving, it's supposed to be fun, relaxing, adventurous, exciting, thrilling and contagious. This is even before you get in the water.
You need to have a good ole time or eventually it stops being good and suddenly you begin to have a bad ole time and as soon as you have enough bad ole times you stop having time.
I don't want any of you to stop having time.
You need to have a good ole time or eventually it stops being good and suddenly you begin to have a bad ole time and as soon as you have enough bad ole times you stop having time.
I don't want any of you to stop having time.
Tuesday, September 1, 2009
Road Trips
 WOW over a month has passed without an entry. Shame on me.
Since returning from Coz there have been a couple of road trips. Fun trips.
On August 21st Chris Jaterka, Tony Siebert, Tyler Stanton and myself took a little road trip, ok I called it a mancation, to SoCal for a couple days of California kelp diving since Tony wasn't able to make it to Coz, he really needed to get out, have salt water in his eyes and cruise the kelp forests.
 Departing on Friday afternoon we drove from SLC through Las Vegas to Primm Nevada were we spent the night at Bu falo Bills before heading into Long Beach the next morning. Did I mention we went through Vegas when it was 113 degrees? Hotttttttt.
 Back on the road early we pull into Long Beach a good hour before we are allowed to board the Cee Ray. With some time to kill we walked around looking at the different dive boats and grabbed a quick bite at the wharf before boarding. Nothing like a fresh fish breakfast.
Once on board and checked in, it was grab a bunk, set up gear and take a nap for the 2 hour boat ride to Catalina.
Looking at the roster I noticed there were only a few of us just diving to have fun and the rest were Advanced Open Water students from a couple Sport Chalet stores in SoCal. On board was Bob Taylor an Instructor/Regional Depertment Head Janine and I had met when the SLC store was opening. It was nice to catch up on things with Bob. So much for being incognito. Oh well. I was also able to meet another Instructor from the Vegas area that was DM'ing for the boat.
Our three dives on the first day were being conducted at sites around Arrow Point. Talking with Captian Bob it is very rare that you get to dive Arrow Point due to the way the currents and swells normally run. Nothing spectacular but it was fun crusing the kelp and seeing Tony and Tyler navigating through the kelp and seeing Tony's eyes get as big as the 6 foot bat ray we saw.

 Due to some sinus issues Tyler and Chris decided to sit out the night dive. It was pretty calm and for some reason not much in the way of marine life.
Heading back it was find your bunk and nap. We arrived back into Long Beach around 11:00 pm.
Since we were heading back out with the Cee Ray the next day they were kind enough to allow us to sleep on board over night. After filling out tomorrows paper work it was bed time.
Day I awoke to the smell of bacon and gear bags being dragged across the deck above. Gaaaawd what time is it. 6:00 Am! Come on people. ;0) OK I'll get some food. It was obvious that Chris has some type of hearing problems because that guy didn't wake up until we were about a half hour away from Catalina. In fact I don't think Chris had a problem sleeping period.
Briefing time. WOW this site looks familiar. Yup, Captain Arnold, father of Captain Bob, thought it would be good to go back to the same area. Not a problem since we were going to be one cove west of yesterday. Dive one we ventured down to the wreck of a sailboat that had sunk a few years ago and was sitting at about 55 feet .

 Dives two and three were done one more cove away and were pretty similar to all the previous sites. Plenty of kelp, some what shallow and with a small reef.
Arriving back into Long Beach around 5:30 it was time to saddle up and hit the road for Las Vegas where we would crash for the night before heading home the next day. Was there gambling involved. Um yeah. Not sure about the winnings of everyone else but I took the casino for $6.15.
All and all it was a fun trip and I would do this one again.


Saturday, July 25, 2009
Cozumel What A Blast
If you have been following you would have known that we had plans to invade Scuba Club Cozumel the week of July 11-18. Invade we did. Twenty eight of us from Utah, nine or so from San Diego and three from Long Beach took up residence.
May hats off to the entire group. They were fantastic.
For most everyone the first dive was off the shore at the resort. Many had never been in salt water so a buoyancy check was in order. Once sorted the dives began. In fact most did a night dive that night or two and every night afterwards.
The first day of boat diving we went a bit conservative to see how many would react to the fantastic drift diving. Not a problem. From there on out it only got better and better.
Columbia Deep, Santa Rosa, Palancar Caves, Punya Tunich, Paradise, and C53 to name a few. For some the ultimate was hitting, now brace yourself, a current less Punta Sur's Devils Throat on the last day or venturing off the island to dive the cenote Dos Ojos.
As for returning, oh yeah I'll be back and I would definately go back to SCC.
May hats off to the entire group. They were fantastic.
For most everyone the first dive was off the shore at the resort. Many had never been in salt water so a buoyancy check was in order. Once sorted the dives began. In fact most did a night dive that night or two and every night afterwards.
The first day of boat diving we went a bit conservative to see how many would react to the fantastic drift diving. Not a problem. From there on out it only got better and better.
Columbia Deep, Santa Rosa, Palancar Caves, Punya Tunich, Paradise, and C53 to name a few. For some the ultimate was hitting, now brace yourself, a current less Punta Sur's Devils Throat on the last day or venturing off the island to dive the cenote Dos Ojos.
As for returning, oh yeah I'll be back and I would definately go back to SCC.
Subscribe to:
Posts (Atom)